

10 DIY Holiday Gifts for Kids to Create
The holidays are the perfect time to create memories with your kids. Crafting homemade gifts together brings your family closer.
When you create something to give family or friends, they can cherish it through the years.
Kids get a sense of pride when they see a friend or family member using or displaying a gift they made.
You can even start a family tradition by making a “refillable” gift. These can be things like baked goods, soaps, or lotions that you make every year or when your recipient’s supply runs out.
This list of 10 fun homemade gifts for kids to make covers all ages and skill levels, so you’re sure to find one that your children will enjoy.

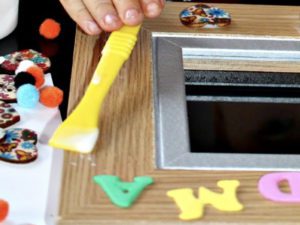
#1 “Helping Hands” Personalized Oven Mitts
Age group: 3 months-2 years
This simple project requires just a few materials and comes from trishsutton.com.
You’ll need:
1 pair of solid colored oven mitts
Fabric paint
A fabric paint marker (optional)
A trim for the openings of the mitts (a bow, ribbon, etc.) (optional)
Instructions:
Step 1: Pour some fabric paint into a bowl or plate
Step 2: Place your child’s palm into the paint, covering it completely
Step 3: Hold your child’s palm down onto 1 oven mitt to leave an imprint
Step 4: Carefully lift your child’s hand, being cautious not to smudge the imprint
Step 5: Repeat steps 2-4 for the other mitt
Step 6: Allow the paint to dry
Step 7: (optional) Write a message, your child’s name, etc., under each handprint with the fabric paint marker
Step 8: (optional) Glue or sew a trim around the opening of each mitt
This gift is for: Family or friends will enjoy this safe and memorable gift any time they are cooking or baking.

#2 Homemade Fridge Magnets Using Crayon Resist
Age group: 4 years and up
Your kids will love the magical quality of how wax and paint work together in this project from happyhooligans.ca.
You’ll need:
- Some blank mini art canvases (similar to large ones, but without wooden frames)
- Watercolor paints
- A white crayon
- Paint brushes
- Thin magnets (you may have some that you’ve received from businesses or you can buy them)
- A hot glue gun
Instructions:
Step 1: Have your child write their name on a canvas with a white crayon and add embellishments like hearts, stars, dots, etc.
Step 2: Have your child brush the watercolor paint over the canvas so that the crayon design shows through the paint
Step 3: Let the paint dry
Step 4: Cut the flat magnet to fit the back of the canvas and hot glue the magnet to the canvas
This gift is for: Friends or family members who enjoy keepsakes of your child.
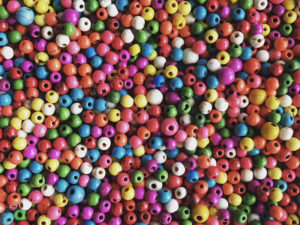
#3 DIY Keychains
Age group: 2 years and up
This is the perfect chance for your child to practice spelling and make a gift they can watch the recipient use. This idea comes from hellobee.com.
You’ll need:
- A package of alphabet beads
- Split key rings
- Leather jewelry string or Rexlace
- Decorative beads (hearts, animals, bright shapes, etc.) (optional)
Instructions:
Step 1: Cut a piece of string about 12 inches long. Fold the string in half, wrap it around the split ring, and pull the end through the loop to secure it to the ring with a tight slipknot
Step 2: Let your children string the alphabet beads to spell the gift recipient’s name or a short message
Step 3: Tie the end of the cord with a tight double knot to secure the beads
This gift is for: Friends or family members who misplace their keys often.
#4 Personalized Photo Frames
Age group: 2 years and up
This simple craft from messylittlemonster.com uses mixed stick-on media to create a keepsake for a friend or family member to enjoy.
You’ll need:
- A photo frame with flat, wide sides
- Stick on letters
- Stick on shapes (hearts, stars, rainbows, etc.)
Instructions:
Step 1: Remove the glass from the frame
Step 2: Let your kids stick letters and shapes to form names or messages onto the frame
This gift is for: Friends or family members who enjoy keepsakes from your child.

#5 Easy 2-Ingredient Fudge
Age group: 6 years and up
This simple fudge recipe from eatsamazing.co.uk cooks in about 5 minutes. Your kids can add an endless variety of toppings like mini marshmallows, candy sprinkles, candy shapes, nuts, and more to create different looks and flavors.
You’ll need:
1 14 oz. can of condensed milk
5 4 oz. bars of sweet baking chocolate, broken into pieces
Toppings of your choice (optional)
A small square baking pan, lined with parchment or aluminum foil
Instructions:
Step 1: Break the chocolate into pieces in a large microwave safe bowl
Step 2: Pour the condensed milk over the chocolate and mix well
Step 3: Microwave the chocolate mixture in 30 second bursts, stirring in between until the chocolate melts
Step 4: Pour the melted chocolate mixture into the lined pan and smooth it with a spatula
Step 5: Quickly add and press in the toppings before the mixture sets
Step 6:Refrigerate for about 2 hours.
Step 7: Carefully remove the cooled fudge from the pan and cut into squares.
This gift is for: Friends or family members who enjoy sweet treats. You can offer to make more when their supply runs out.
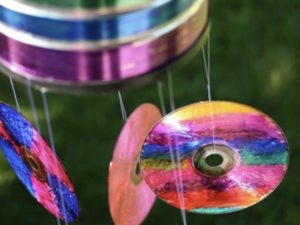
#6 Coffee Can CD Wind Chime
Age group: 6 years and up
This is a fun way to upcycle used CDs and DVDs from happyhooligans.ca. Your kids will enjoy coloring the can and CDs by coming up with their own designs.
You’ll need:
1 full-size coffee can with the label removed
2 plastic coffee can lids
5 used CDs or DVDs
A 1-hole punch
Fishing line, yarn, or twine
Bright colored Sharpies
Instructions:
Step 1: Color the can and CDs any way you’d like with the markers
Step 2: Punch 5 holes around 1 coffee can lid
Step 3: Cut long strands of the fishing line, thread on each CD, hold the 2 string ends together, thread them through 1 hole on the lid and knot the ends so they stay secure. Making the lines different lengths will add variety
Step 4: Repeat step 3 until all of the CDs are tied on
Step 5: Attach the lid to the bottom of the can so that the CDs hang down
Step 6: Punch two holes in the other coffee can lid across from each other. Thread a piece of fishing line through the holes and knot the string ends to create a hanger
Step 7: Hang the completed wind chime outside and wait for a breeze
This gift is for: Any friend or family member who appreciates the music of nature.

#7 Herbal-Infused Honey
Age group: 6 years and up
This is a simple and useful gift to make that is also medicinal. Children love to watch the bubbles rise in the honey after adding it to the herbs.
You will need:
Small jars with tight-fitting lids
Dried or fresh herbs (enough to fill the jars 1/3-1/2 full)
A chopstick or butter knife
Instructions:
Step 1: Chop the herbs into small pieces and fill the jars 1/3-1/2 full. Herbs that work well include:
- Chamomile
- Lavender
- Sage
- Spearmint or peppermint
- Elderberry
- Rose hips or petals
- Cinnamon
- Thyme
- Lemon balm
- Ginger
- Vanilla bean
Step 2: Pour in honey to fill the jars and stir the herbs into it
Step 3: Put the jars in a sunny area and turn them over each day to keep the herbs submerged for 2-4 weeks
When you gift your jars, your recipients can choose to strain the herbs out of the honey or keep it in.
The honey is excellent in tea or as a spread. Medicinal infusions like thyme, sage, or rose petal can soothe sore throats and coughing.
This gift is for: Friends or family members who enjoy gifts that are naturally healthy.

#8 Painted Concrete Sphere Bookends
Age group: Tweens and up easy to clean up afterwards, like outdoors or in an open garage.
You will need:
A bag of white masonry cement mix
A large mixing bowl
A spoon
A pair of sphere cake pans
Vegetable oil
A sanding brick
Spray paint
A paint pen (optional)
Instructions:
Step 1: Prep the halves of the cake pan by rubbing them with vegetable oil
Step 2: Measure the cement mix into the mixing bowl by estimating how much cement you will need to fill each cake pan, add water and mix until the mixture resembles cake batter
Step 3: Pour 1/2 of the cement mixture into each half of the sphere until they are filled to the top. Shake and tap the pans gently to remove any air bubbles, then set them aside to cure overnight
Step 4: When both halves are cured, remove them from the molds and sand them smooth
Step 5: Sand down one side of each hemisphere 2”-3” so that they will sit flat on a bookshelf
Step 6: You can choose to leave them white or spray paint them 1 color or 2 different colors..You can add splatter accents to the paint by flicking a contrasting paint pen over them. Black, silver, or gold work best
Step 7: When the paint is dry, they are ready to use
This gift is for: Any friend or family member who loves books and wants an attractive way to store them.
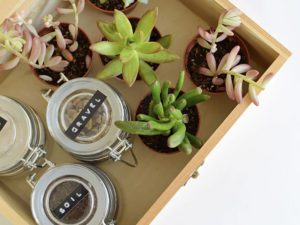
#9 DIY Succulent Gift Box
Age group: Tweens and up
This easy, attractive botanical gift idea from burkatron.com gives your recipient a collection of easy-to-grow mini plants to accent a home or office.
You will need:
A wooden box
3-4 mini succulent plants
3 small glass clip-top jars
A label maker
Succulent/cactus soil
Gravel
Sand (optional)
Instructions:
Step 1: Fill 1 jar with sand, 1 with gravel, and 1 with soil and put labels on the top of each one
Step 2: Arrange the jars in the box and place the mini succulents beside them
You can choose a box with a lid or without. Your recipient can use the ingredients in the jars to be sure their plants are healthy and have good drainage.
This gift is for: Any friend or family member who enjoys houseplants, but has difficulty growing them.
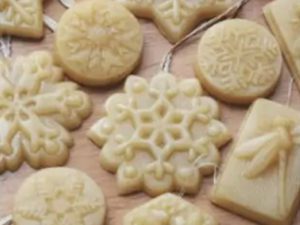
#10 DIY Lotion Bars
Age group: Tweens and up
These lotion bars from howweelearn.com and ouroilyhouse.com are easy to make and can be scented with dried or fresh herbs or essential oil. They can melt if they are stored above 75°F.
You will need:
3/4 cup of beeswax (grated, chopped, or pellets)
1 cup coconut oil
A pinch of dried herbs, like lavender, or 15-30 drops of essential oil
A small amount of Vitamin E oil (optional)
A loaf pan or metal or silicone molds
Instructions:
Step 1: Melt the beeswax in a bowl above a pot of boiling water
Step 2: Take the melted wax off the heat and stir in the coconut oil and the herbs or oils
Step 3: Pour the mixture into the loaf pan or molds
Step 4: Set the molds aside for about 1 hour to harden or place them in the fridge to speed the process
Step 5: Remove the bars from the molds and cut them if needed
You can experiment with different herb or oil combinations to find ones you like—rose, lavender, chamomile, yarrow pom, or frankincense. Lemongrass and cedarwood give a masculine scent.
This gift is for: Any friend or family member who suffers from dry skin, especially in the winter.
Make Holiday Gift Shopping a Family Affair at ThriftSmart
When you’re looking for that special gift, you’ll find an amazing array of gently used items at ThriftSmart. At ThriftSmart, we sell our clothing and shoes tax-free and 100% of our profits go to support local charities.
You and your children will enjoy browsing through aisles of brand name clothing, shoes, and housewares to find the perfect gift. When you gift secondhand items, you keep them out of landfills,
You can save money by shopping with us and feel great that your purchases help others and our planet. Visit ThriftSmart today.