Add That Homespun Touch to Your Thanksgiving with These 10 Fun Crafts for Kids
Make decorating for your Thanksgiving feast a fun family affair. These 10 Thanksgiving craft ideas will delight your young ones. Plus, they are easy to create!
Kids love to get involved in your holiday preparations. You’ll be creating a family tradition that will continue for years to come.
#1 Washi Tape Thanksgiving Banner

This simple banner from pinkstripeysocks.com is easiest to prep in parts and assemble at the end, so your kids stay focused while making it.
You’ll need:
- Orange drinking straws
- Colored washi tape in different patterns
- Mini popsicle sticks
- Watercolor paints
- A thin line marker
- Hot glue
- Letter stencils
- Paint chips in different colors
- Colored pencils
- Scissors
- Tape
- Orange yarn
Instructions:
Prep the banner base
- Cut several drinking straws into 2-inch lengths.
- Wrap washi tape in contrasting colors and patterns around the straws to decorate them.
Prep the stars
- Draw lines on the popsicle sticks to divide them in half.
- Paint each half with the watercolors.
- After the paint dries, glue the popsicle sticks together to make stars.
Prep the letters and assemble
- Draw out the letters you want on the paint chips using the stencils.
- Color the letters with colored pencils and cut them out.
- Assemble the banner by stringing the straw beads onto a long piece of orange yarn, tying on the stars and taping on the letters.
- Hang up the finished banner for your family to enjoy.
#2 Beaded Pipe Cleaner Indian Corn
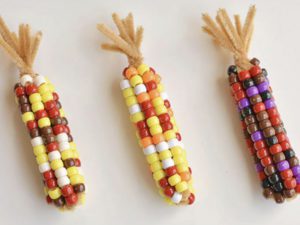
This project from onelittleproject.com uses only 2 materials that are easy to find at a dollar store. You can string the finished pieces together to make garlands or use them separately as place card holders for your table.
You’ll need:
- 120 pony beads for each ear in different colors
- 4 12-inch tan pipe cleaners
Instructions:
Step 1: Line up the ends of 4 pipe cleaners and twist them together in the middle. Fan out the ends of the pipe cleaners into a star pattern.
Step 2: String about 15 pony beads onto each section of the star in different color combinations.
Step 3: After you finish stringing, bend all of the pipe cleaner ends together.
Step 4: Twist the ends together a couple times and fan them out to make the ”husks”.
#3 Clothespin Wreath
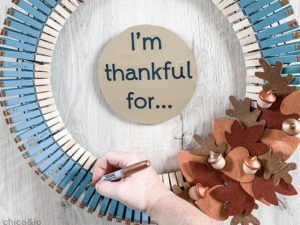
This is a beautiful way to display things that your family members are thankful for. And your kids can have fun painting the clothespins with different color combinations. You can create an optional center piece that ties the theme together. This craft comes from chicaandjo.com.
You’ll need:
- A wire wreath frame
- About 65 wooden clothespins
- Orange, brown, and yellow acrylic paint
- Paintbrushes
- A wooden heart (optional)
- Ribbon
- A thin line marker
Instructions:
Step 1: Paint the clothespins, combining the colors any way you want.
Step 2: Let them dry and clip them around the wreath frame
Step 3: If you want to, paint a message on the wooden heart and suspend it from the center on a ribbon.
Step 4: Tie one end of a ribbon to the wreath and the other end to the marker so your guests can write what they’re thankful for on each clothespin.
#4 Blow Painted Turkey
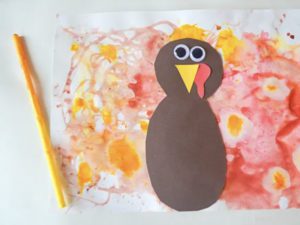
Kids can create unique feather patterns by blowing paint across paper with a straw in this colorful craft from happytoddlerplaytime.com.
You’ll need:
- Water
- Straws
- Googly Eyes
- White watercolor paper
- Syringe (optional)
- Brown, red, yellow, and orange washable paint
- Brown, red, and yellow construction paper
- Scissors
- Glue
- Bowls, paper plates and/or a paint palette
Instructions:
Step 1: Put globs of paint on your palette and mix them with water to thin them out.
Step 2: Let your kids pick up the paint with the end of a straw, drop it on the watercolor paper and blow it around the paper using the straw. Use different colors to make feather patterns.
Step 3: Let the paint dry.
Step 4: Draw and cut out the parts of the turkey from construction paper—brown body, yellow beak, and red wattle.
Step 5: Glue the turkey together and add the eyes.
Step 6: After the paint is dry, glue the turkey to the center of the paper.
#5 Marbled Fall Leaves
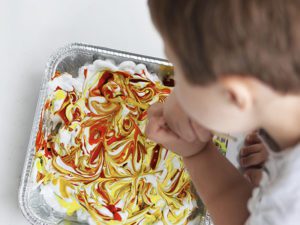
These painted leaves from iheartartsncrafts.com are quick and easy to make. You can add them to banners, wreaths, or other Thanksgiving decorations.
You’ll need:
- Leaf cutouts at https://www.iheartartsncrafts.com/wp-content/uploads/2015/08/Leaves.pdf
- Shaving cream
- White card stock
- Piece of cardboard
- Skewer
- Paint
- Scissors
- Disposable aluminum foil pan
Instructions:
Step 1: Copy the leaf patterns onto card stock and cut them out.
Step 2: Spray shaving cream into the aluminum pan, add any colors of paint you like and swirl the mixture with a skewer.
Step 3: Set the cutouts into the paint mixture, pull them out, and scrape off the shaving cream with the cardboard. You’ll have a marbled design left.
Let the leaves dry and you have beautiful decorations for wherever you want to use them.
#6 Woodland Folk Toys
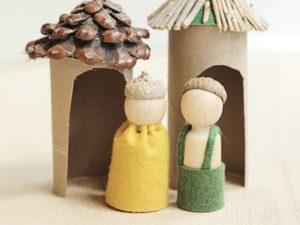
These delightful little figures from triedandtrueblog.com add a homespun touch to your Thanksgiving decorations.
You’ll need:
- Wood peg people
- Wool felt
- Wood sticks
- Pinecones
- Acorn caps
- Toilet paper rolls
- Recycled cardboard
- Strong double-sided tape
- Glue gun
Instructions:
Prep the roofs
- Gather natural supplies (twigs, pinecones, acorn caps, leaves, grass, etc.)
- Cut circles from a piece of recycled cardboard and slit them up the middle. Fold
- them over onto themselves to make cone shapes and staple them in place.
- Trim the natural materials and tape them to the roof cones.
Make clothes for the figures
- Cut a strip of wool felt and sew a straight line across the top.Pull the thread to
- gather, wrap it around the base of 1 peg, and sew it in place.
- Cut two thin pieces of wool felt lined with double-sided tape and adhere on
- another peg for suspenders. Attach another panel of wool felt at the base of the peg to make pants.
- Glue acorn caps on the heads of both peg people.
Build the little houses
- Cut arches into each of the toilet paper rolls and glue a roof onto each one.
Once they dry, your woodland toys are ready for play.
#7 Turkey Windsocks
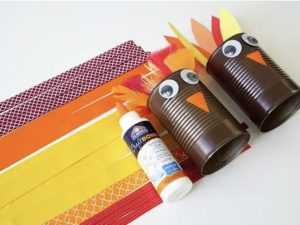
These adorable windsocks from happinessishomemade.net take around 30 minutes to make and are a fun addition to your outdoor Thanksgiving decor.
You’ll need:
- Recycled food can (cleaned and dried, with top and bottom removed)
- Brown paint
- Elmer’s CraftBond quick dry glue
- Elmer’s medium tip painters pen, orange
- Large googly eyes
- Ribbons in Fall colors
- feathers, felt, and/or construction paper in Fall colors (can mix and match)
- Masking tape, optional
Instructions:
Build the turkey
- Paint the can brown and let it dry.
- Draw a triangular beak with the orange painter’s pen.
- Attach the eyes above the beak with the quick dry glue.
- Cut out a red wattle from felt or paper and glue it near the beak.
- Apply a thick line of glue inside the rim at the back side of the can, and attach
the turkey’s tail “feathers” (use feathers, construction paper, felt, etc.)
Build the windsock
- Cut 10-15 pieces of ribbon approximately 18″ long
- Apply another thick line of glue around the entire inside rim at the bottom of the can, and attach the ribbon streamers. Allow them to dry completely.
Make a hanger
- Make a ribbon hanger for the top and glue it on.
After the whole piece is dry, hang it on a branch and wait for a breeze.
#8 Leaf Suncatcher
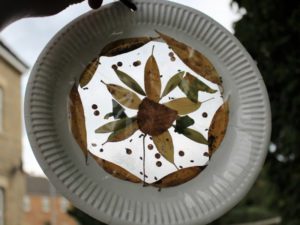
Making this attractive suncatcher from messylittlemonster.com is an excellent project for young kids because they can go outside in the fresh air to gather the materials.
You’ll need:
- A collection of leaves
- Paper plates
- Sticky back plastic / contact paper
- A Pipe cleaner or string for hanging
- Scissors
- Hole punch
Instructions:
Step 1: Gather some leaves in different shapes and colors from outside.
Step 2: Cut out the center of a paper plate
Step 3: Cut 2 pieces of clear contact paper that are larger than the hole in the plate. Apply 1 piece over the hole on the back of the plate and save the other.
Step 4: Arrange the leaves on the sticky side of the contact paper, cutting them or keeping them whole if you’d like.
Step 5: Apply the second piece of clear contact paper over the leaves to keep them in place.
Step 6: Punch a hole at the top of the plate and insert string or a pipe cleaner to make a hanger and put your suncatcher up in a window.
#9 Leafy Placemats
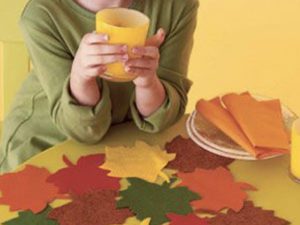
Dress up your Thanksgiving table with this colorful Fall-inspired project from womansday.com.
You’ll need:
- Construction paper or felt in assorted colors
- Fabric glue
- Clear contact paper (optional)
Instructions:
Step 1: Trace or draw a leaf onto paper and cut it out to use as a pattern.
Step 2: Trace the leaf shape onto colored felt or construction paper (you’ll need about 12 leaves) and cut them out.
Step 3: Arrange the leaves into a rectangle so that they overlap each other with open spaces between them.
Step 4: Glue leaves together where they overlap. If using construction paper, cover the leaves with contact paper or laminate them.
#10 Easy-to-Make Thankful Tree Craft
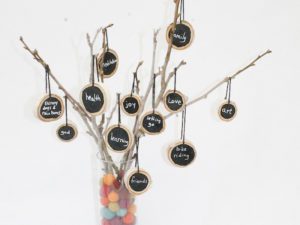
Make expressing your gratitude more fun this year with this whimsical Thankful Tree from momtastic.com. Have your kids help out with gathering sticks, painting or deciding what to put on the ornaments.
You’ll need:
- A glass vase
- Colorful pom poms
- Sticks from the yard
- Tree branch slices (found at craft stores)
- A drill
- Yarn
- A needle
- Black craft paint or chalkboard paint
- White chalk, chalk marker, or paint pen
- Paintbrush
- Scissors
Instructions:
Step 1: Paint the tree branch slices with black or chalkboard paint and let them dry.
Step 2: Drill small holes into the tree branch slices, pull yarn through with a needle, then tie it off to make hangers.
Step 3: Use chalk, a chalkboard marker, or white paint to write what you’re thankful for on each slice.
Step 4: Get some sticks from outdoors, position them in your vase, and add the pompoms around them for color.
Step 5: Hang your mini gratitude ornaments from the branches.
Make a Trip to ThriftSmart Part of Your Thanksgiving Preparations
These tips come to you from the team at ThriftSmart.
Whether you’re looking for a gently used tablecloth, a pot for the mashed potatoes, extra silverware, plates, or a special serving piece, you’ll find a wonderful selection at ThriftSmart.
And you can feel good about the money you save by choosing secondhand goods. Your purchases fund local charities and keep more items in circulation and out of landfills.
Visit ThriftSmart today.


Sorry, the comment form is closed at this time.